
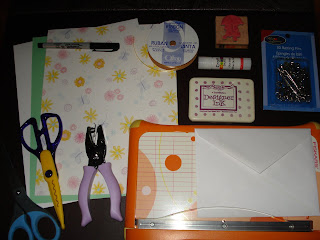
- Printable cardstock for the inner invitation (1 per 6 invitations)... I used light green since she doesn't know what she's having yet. I also used white and glued the two pieces together to make it fancier, but this is just an option
- A glue stick (if you decide to go with my method above)
- Cute printed paper (8x11) for the diaper (1 page per invitation). I found that white was just too plain so I went to a scrapbooking store and found paper with butterflies, flowers, and swirlies on it. If you know the gender of the baby, there is A LOT of cute pink and blue patterned options
- Scissors - regular and craft scissors for the details. If you have a slicer, that will save you some time, too
- A hole puncher
- A felt tipped pen
- Large safety pins- I searched for actual diaper pins but did not come across any
- Invitation envelopes
- A cute baby-themed stamp and an ink pad (optional)
To start, take a diaper pattern (which can be found here) and use it to cut out all of the "diapers" on your patterned paper. If the pattern goes one direction or the other, make sure that the flap that faces front shows the pattern right-side up. Below is the pattern I found online (left) next to one that I ended up cutting out (right)... I opted not to cut all of the frills out and used craft scissors in a later step instead to make it a little faster. Either method works.

Next, fold up the "diaper" and secure the front with a safety pin. To fold up the diaper, fold it in half vertically and then pull the side flaps in. The one shown below has been folded, and then as I mentioned earlier, I took craft scissors and cut the frillies on the leg holes.
I set that part aside and started on the inner-invitation. Using Microsoft Word or Publisher or any program really, type the information using only 1/6 of the page. The space will be limited, but the diaper sleeve ends up being about the size of your hand. You can either use one side or both sides of the paper depending on how much information you have. In our case, we put a cute little phrase on one side and then all of the information on the other. I also printed one on the green cardstock and one on the white cardstock, frilled up the edges of the white one with craft scissors, and glued them together for a bit of a fancier look. Lastly, punch a hole in the top and tie a ribbon in a bow through it to make it easier to pull out of the diaper sleeve. Below is the components of my finished product as well as one put together:


Lastly, if you're still wanting to personalize it a little more, take your stamp and the ink pad and use it somewhere on the invitation envelope. I think it adds a nice touch.

So that's about the extent of what I can share in terms of being crafty today... I'm still a work in progress, but they were a big hit! And this posting only assures me that I should never start a cooking or a how-to blog unless I plan to have REALLY LONG posts. Because honestly, I could have added WAY more details than I did, but hopefully this is more than enough to get my point enough. Happy crafting!
And PS - a post about her actual shower will soon follow, too!

No comments:
Post a Comment